Datahub.local

Migrating PostgreSQL in Kubernetes: A Homelab Christmas Adventure

Introduction

In a Production environment, upgrading databases is arguably one of the most critical and nerve-wracking tasks a DevOps or SRE team has to face. We all know someone (or are someone) who has a war story about a "simple" upgrade turning into a lost weekend spent recovering data.

In the era of Kubernetes, this pressure is compounded because the release velocity is so fast; you're often looking at a major version upgrade every 1 to 1.5 years. That is exactly why, in every company I’ve worked for, I always suggest using DB as a Service (like AWS RDS). Offload that pain to the cloud provider so you can sleep at night.

However, in my Homelab (Datahub.local), I don't have that luxury (and the budget!). So, this holiday season, it was finally time to bite the bullet and upgrade my PostgreSQL cluster running on CloudNativePG (CNPG).

The Challenge: It's Not Just One Version

CNPG Upgrade Infographic

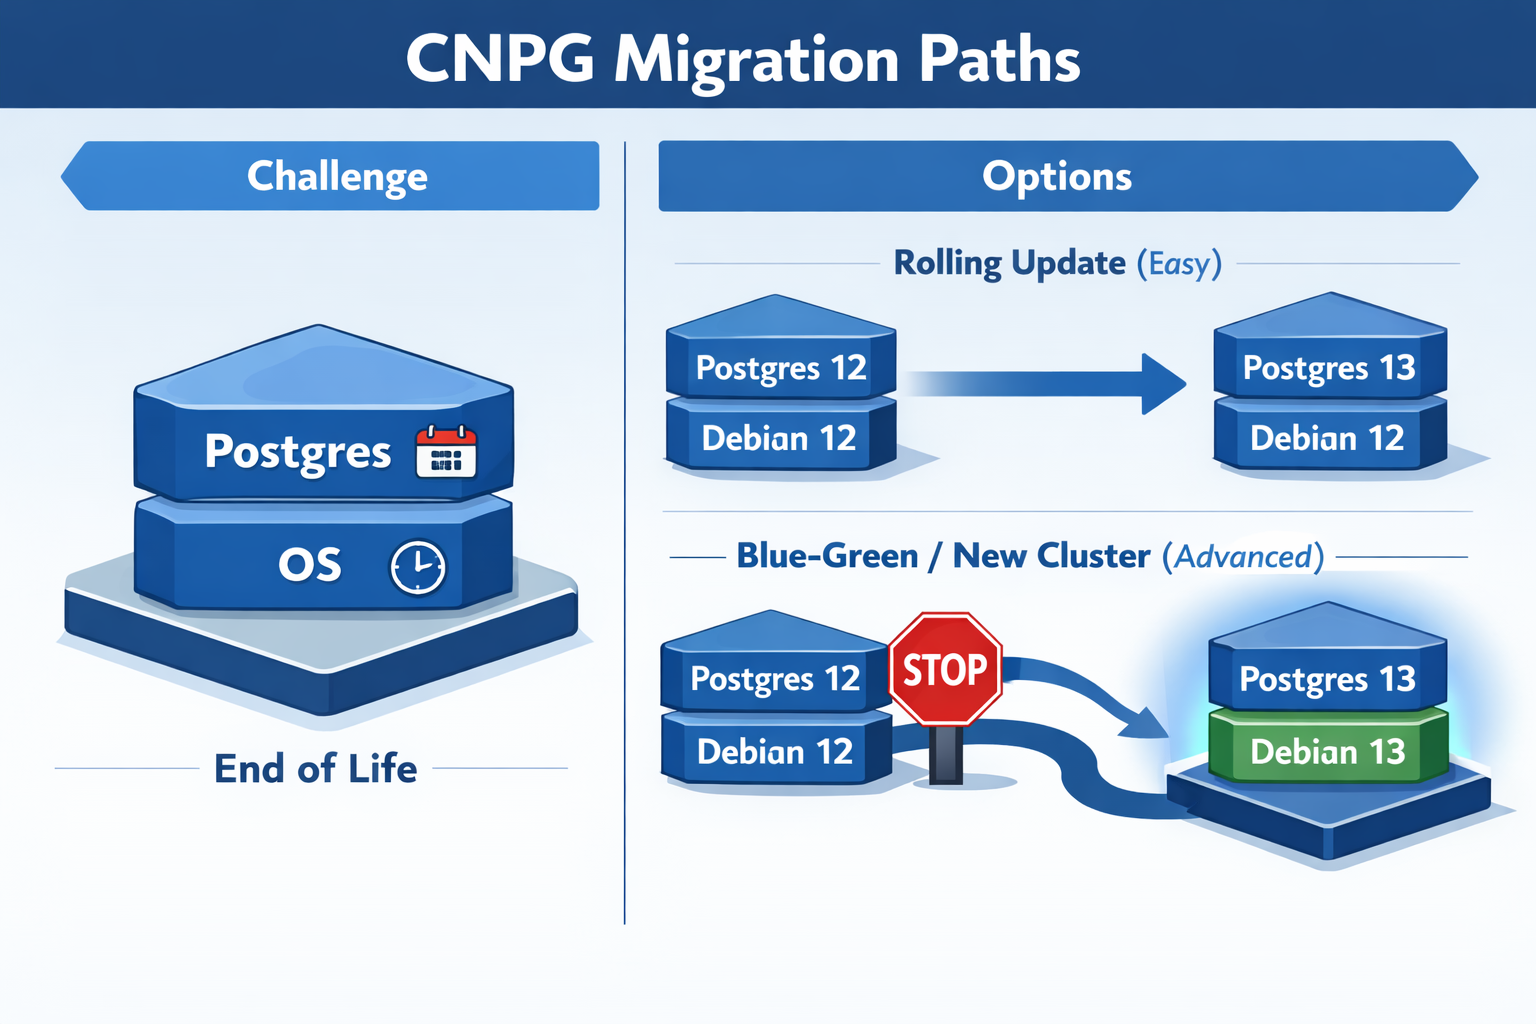
Before diving into the "how," it's important to understand that with CloudNativePG, you aren't just managing one version. You are juggling two: 1. The PostgreSQL Version 2. The OS Version of the container image (usually Debian based)

Both have different End-of-Life (EOL) dates that you need to watch out for.

PostgreSQL EOLs:

Version Release Date EOL
18 2025-09-25 2030-11-14
17 2024-09-26 2029-11-08
16 2023-09-14 2028-11-09

Debian OS EOLs:

Name Status EOL
Trixie (stable) Supported 2030-06-30
Bookworm (oldstable) Supported 2028-06-30
Bullseye Deprecated 2026-08-31

Depending on what you need to upgrade, the difficulty level changes exponentially.

More info on that can be found in the CNPG PostgreSQL Container Images.

Rolling Update: Level Easy (Postgres Only)

If you stick to the same OS, upgrading Postgres is trivial. You can go from Postgres 16 to 17 just by changing the image tag.

Rolling Update means CNPG gradually replaces one pod at a time while maintaining the cluster's availability—no downtime, no data movement needed.

apiVersion: postgresql.cnpg.io/v1
kind: Cluster
metadata:
  name: pg-cluster
spec:
  # Changing from 16 to 17 on the same OS (Bookworm)
  image: ghcr.io/cloudnative-pg/postgresql:17-system-bookworm 
  instances: 3
  storage:
    size: 1Gi

Blue-Green Update: Level Advanced (Postgres + OS)

This is where I found myself. I wanted to move from Postgres 16 on Bookworm to Postgres 17 on Trixie.

Here's the catch: You cannot do a direct rolling upgrade if the underlying OS changes. The glibc versions or other system libraries might differ, making the data directory incompatible or risky to upgrade in place.

Blue-Green Update is the solution—you deploy an entirely new cluster alongside the old one, migrate data, then switch traffic over. This approach is safer when OS components differ, and it gives you a quick rollback option if issues arise.

My Migration Strategy

Since I wanted the latest and greatest (and to reset the clock on those EOL dates), I opted for the advanced path. Here is the workflow I used to migrate with zero downtime for my apps.

Step 1: The Abstraction Layer

First, I created a Kubernetes Service of type ExternalName. This acts as a pointer. I configured all my applications to talk to this Service (pg-cluster-entrypoint) instead of the actual CNPG service name.

This is crucial because it decouples the "address" my apps use from the actual cluster running behind the scenes.

apiVersion: v1
kind: Service
metadata:
  name: "pg-cluster-entrypoint"
spec:
  type: ExternalName
  # Pointing to the CURRENT Postgres 16 cluster
  externalName: 'pg-cluster-rw.postgres.svc.cluster.local'
  ports:
    - name: postgres
      port: 5432
      protocol: TCP
      targetPort: postgres

Step 2: The New Cluster

Next, I spun up a completely new cluster running Postgres 17 on Trixie. I used the bootstrap.initdb.import feature to pull data directly from the old cluster. More info on that can be found in the CloudNativePG docs.

apiVersion: postgresql.cnpg.io/v1
kind: Cluster
metadata:
  name: pg-cluster-17
spec:
  image: ghcr.io/cloudnative-pg/postgresql:17-system-trixie
  instances: 3
  bootstrap:
    initdb:
      import:
        type: monolith
        databases:
          - "*"
        roles:
          - "*"
        source:
          externalCluster: old-pg-cluster
        pgDumpExtraOptions:
          - --no-privileges
  storage:
    size: 1Gi
  externalClusters:
    - name: old-pg-cluster
      connectionParameters:
        # Connect to the OLD cluster
        host: pg-cluster-rw.postgres.svc.cluster.local
        user: postgres
        dbname: postgres
        sslmode: require
      password:
        name: pg-cluster-superuser
        key: password

This creates a fresh cluster that starts life as a clone of the old one.

Step 3: The Switchover

Once the new cluster was healthy and the data was synced, the magic happened. I simply updated the ExternalName service to point to the new cluster.

apiVersion: v1
kind: Service
metadata:
  name: "pg-cluster-entrypoint"
spec:
  type: ExternalName
  # Update DNS to point to the NEW Postgres 17 cluster
  externalName: 'pg-cluster-17-rw.postgres.svc.cluster.local'
  ports:
    - name: postgres
      port: 5432
      protocol: TCP
      targetPort: postgres

My applications started resolving the DNS to the new IP, and the migration was complete. I verified everything was working, and then decommissioned the old cluster.

Conclusion

While upgrading databases in a Homelab doesn't carry the same financial risk as production, it’s a great playground to practice these "Advanced Level" patterns. Using an ExternalName service as a stable interface allowed me to swap the underlying infrastructure without having to reconfigure a single application.

The process was surprisingly smooth, and now I'm set with the latest Postgres and OS versions for years to come. Hope this helps anyone else planning their holiday upgrades!

Happy New Year 2025! 🎉

Yet Another Kubernetes To-Do List

Ever noticed how easy it is to kickstart your app on Kubernetes locally? Just a couple of commands and boom – it's up and running! But let's face it, real-world setups are a whole different ball game.

Take my Datahub.local project, for example. It's not just a data platform; it's a whole ecosystem of things running on Kubernetes. I've also got monitoring, storage solutions, CI/CD pipelines and many more. So suddenly, The initial simplicity feels like a distant dream.

Kubernetes To-Do List

1. Select a Kubernetes Distribution

Choosing the right Kubernetes distribution is crucial, especially considering your specific needs and infrastructure requirements. Options range from full-fledged, self-managed distributions like vanilla Kubernetes to lightweight solutions tailored for low-end devices.

  • Vanilla: Ideal for environments where customization and control are paramount, vanilla Kubernetes offers the flexibility to tailor the cluster to your exact specifications. However, it may require more manual configuration and maintenance efforts.
  • Managed: Platforms like Google Kubernetes Engine (GKE), Amazon Elastic Kubernetes Service (EKS), and Microsoft Azure Kubernetes Service (AKS) provide fully managed Kubernetes clusters, abstracting away much of the underlying infrastructure management. They're great for teams looking to offload operational overhead and focus on application development.
  • Enterprise: Solutions like Red Hat OpenShift, Rancher or VMware Tanzu offer enterprise-grade features and support, making them suitable for organizations with complex deployment requirements and regulatory compliance needs.
  • Lightweight: For resource-constrained environments or low-end devices, lightweight Kubernetes distributions like K3s or MicroK8s are excellent choices. k3s is optimized for production workloads in resource-constrained environments, while MicroK8s provides a lightweight, easy-to-install Kubernetes for development and testing purposes. These distributions offer reduced resource overhead and simplified installation, making them ideal for edge computing or IoT deployments.

Consider factors such as ease of deployment, scalability, support, and compatibility with your existing infrastructure when evaluating Kubernetes distributions. Choose the one that best fits your project requirements and long-term goals, ensuring a smooth and efficient Kubernetes deployment experience.

2. Storage and Backup Strategy

Now it's time to review storage and backup – the backbone of our data resilience. Now, when it comes to picking the right storage solutions, we've got some solid options on the table. Longhorn and Rook/Ceph are likely your best bets for storage services.

Think of Longhorn as your go-to buddy for block storage. It's sleek, easy to use, and packs a punch when it comes to reliability. With features like built-in backup and restore capabilities, it's like having a safety net for your critical data.

Now, if you're into distributed file systems, Rook/Ceph is the big name of the market. It's like having your own personal cloud storage solution right in your Kubernetes cluster including its own S3 compatible solution. Plus, with Rook's seamless integration with Kubernetes, setting up and managing Ceph clusters becomes a breeze.

So, whether you're storing mission-critical databases or hosting media files for your next big app, Longhorn and Rook/Ceph have got you covered. Keep your data safe, keep it resilient.

3. Securing External Services

Alright, let's talk about locking down those external services trying to cozy up with your Kubernetes cluster. You don't want just anyone waltzing in and causing chaos, right?

So, first things first, let's beef up that security. Consider using an Ingress controller with TLS termination. You are ensuring encrypted communication between your services and the outside world. Plus, it adds that extra layer of protection against eavesdroppers.

Now, onto authentication – because not everyone should get access. OAuth2 Proxy can be your best friend here. Think of them as the gatekeepers who verify everyone's credentials before they're allowed in. With an OAuth2 Proxy you can use providers like Google, Github, Keycloak or Dex, you can enforce user authentication and authorization policies, making sure only authorized users can interact with your services.

But wait, there's more! Ever heard of Cloudflare Tunnel? It's like your service's secret agent, keeping it hidden from prying eyes on the internet. Instead of exposing your services directly, Cloudflare Tunnel acts as a secure conduit, routing traffic through Cloudflare's network without exposing your server's IP address.

4. Certificate Management

What about managing certificates in Kubernetes? Cert-Manager's got your back. It's like your personal assistant for all things TLS certificates. With Cert-Manager, you can automate the whole shebang – issuing, renewing, and revoking certificates – without breaking a sweat.

Oh, and here's a pro tip: even for your local setups, consider using your own domain. Yeah, I know it sounds fancy, but trust me, it's worth it. It keeps things consistent across all environments, from local to production.

5. Securing Secrets

Keeping your sensitive data safe is like guarding the treasure chest of your app. With Kubernetes, you've got options aplenty for secret storage. You could start with the classic vanilla Secrets, where your secrets are stored in your cluster's etcd database. It gets the job done, but it's like hiding your keys under the doormat – not the most secure option out there.

If you want to step up your game, consider Sealed Secrets. Think of them as secret messages locked tight with encryption, so even if someone snoops around, they can't make heads or tails of your precious data.

Then there's External Secrets, where you outsource secret management to specialized tools like HashiCorp Vault or AWS Secrets Manager. It's like having a super-secure vault guarded by dragons – nobody's getting in without the right keys.

No matter which route you choose, make sure to encrypt your secrets at rest and in transit. Rotate them regularly like changing the combination on a safe, and you'll sleep soundly knowing your secrets are safe and sound.

6. Deployment Automation with GitOps CD Tool

Say goodbye to manual deployment headaches and hello to streamlined automation with GitOps Continuous Delivery (CD) tools like Flux and Argo CD. These tools take the hassle out of managing Kubernetes resources by syncing your cluster state with version-controlled Git repositories.

With Flux, you can define your desired cluster state in Git and let Flux automatically apply those changes to your cluster, keeping everything in sync effortlessly. It's like having a trusty assistant who ensures your applications are always up-to-date without you lifting a finger.

On the other hand, Argo CD provides a slick user interface for visualizing and managing your Kubernetes applications. Simply declare your desired state in Git, and Argo CD will continuously monitor your repository for changes, automatically applying them to your cluster. It's like having a personal Kubernetes concierge, always ready to cater to your deployment needs.

Whether you prefer Flux's simplicity or Argo CD's user-friendly interface, embracing GitOps principles with these CD tools will revolutionize your deployment workflows, making them smoother, more reliable, and ultimately more enjoyable.

7. Monitoring and Observability Stack

Next thing you want to keep a close eye on is what's happening in your Kubernetes cluster, right?

First up, we've got the kube-prometheus-stack. It's like your Swiss Army knife for Kubernetes monitoring. With Prometheus for metrics and Grafana for visualization, it's a powerhouse combo that gives you all the insights you need into your cluster's health and performance. Besides, you can install Loki for logs aggregation.

But hey, maybe you're not into managing all that yourself. No worries! There are some fantastic SaaS options like Datadog and Dynatrace. These guys handle all the heavy lifting for you, giving you top-notch monitoring and observability without the hassle of managing your own stack.

Plus, there are tools like Robusta which can help automate essential SRE actions, saving you time and headaches.

So whether you choose one or another depends on free cost or prefer the convenience of a managed service, there's something out there to suit your monitoring needs.

5 Essential Things to Know Before Building Your Homelab

In my previous post, Homelab For Begineers, I provided a general overview of what a Homelab is, why you might want one, and a brief discussion of its architecture and components. After several weeks of hard work, patience, and even a few tears, I'm excited to announce that my own Homelab is finally up and running.

Back of the case Final assembly

Rather than diving into the specifics of how I assembled it, I believe it's more beneficial to share a list of key insights that I wish I had known before embarking on this journey.

And if you're curious to see how I set up my own Homelab, you can find a detailed guide at DataHub.local.

1. Plan, Measure, Implement

In the realm of Homelab building, the mantra of "plan, measure, implement" cannot be overstated. While your design may appear flawless in your mind's eye, the reality of physical space and component compatibility can present unforeseen challenges.

Some advice includes:

  • Design Carefully: Begin by sketching out an architecture diagram and listing all necessary steps, components, and tools required for your project. Don't forget to include even the smallest details, such as screws and cables.
  • Measure Everything: Precision is key when it comes to constructing custom cabinets or arranging equipment within your Homelab. Measure distances between holes and components accurately, and visually assess how devices fit together. Account for the space occupied by cables and connectors, ensuring proper ventilation to prevent overheating.

2. Don't Be Too Perfectionist

It's easy to fall into the trap of perfectionism. However, it's essential to remember that functionality should always take precedence over aesthetics.

Focus on achieving your primary objectives, such as ventilation, accesibility, and future upgradability, rather than obsessing over minor imperfections or cosmetic flaws. Remember that the true value of your Homelab lies in its ability to support your learning, experimentation, and personal projects, regardless of its appearance.

By prioritizing functionality and adopting a more forgiving attitude toward imperfections, you can alleviate stress, maintain momentum, and ultimately enjoy a more fulfilling Homelab experience.

3. Without 3D Printing, Adaptation and Assembly Can Be Challenging

In the world of Homelab construction, the ability to adapt and customize components to fit your specific needs is invaluable. However, without access to a 3D printer, achieving this level of customization can be challenging.

When faced with non-standard requirements or unique configurations, the lack of 3D printing capabilities may limit your options for adapting components or creating custom enclosures. This can result in a more cumbersome assembly process, as you may need to rely on makeshift solutions or compromise on your original design vision.

To overcome this limitation, consider exploring alternative methods of modification, such as using off-the-shelf enclosures and mounting hardware creatively. Additionally, leverage online communities and forums to seek advice and share ideas with fellow enthusiasts who may have encountered similar challenges.

4. Have a Well-Stocked Warehouse, Neighbor, or Familiar Nearby

No matter how meticulously you plan your project, unexpected needs and challenges are bound to arise. Having access to a well-stocked warehouse, a helpful neighbor with a diverse tool collection, or a familiar nearby can be a lifesaver in such situations.

From realizing you're missing a critical component to encountering unforeseen compatibility issues, having a nearby resource can save you time, money, and frustration. Whether it's borrowing a specialized tool, sourcing a last-minute replacement part, or simply seeking advice from a knowledgeable neighbor, having support nearby can make all the difference in successfully completing your project.

5. Customs exists

A significant consideration for Homelab enthusiasts, especially those sourcing equipment internationally, is the impact of customs regulations.

As of July 1, 2021, a new EU law has altered the landscape of importing goods from non-European Union countries, particularly from China. This legislation aims to level the playing field between Chinese and EU suppliers, but it introduces complexities for consumers.

Key changes include:

  • Goods under 150 euros: Consumers are subject to additional VAT charges, typically managed by the seller.
  • Goods over 150 euros: In addition to VAT, consumers must pay additional duties and fees, which can be time-consuming and costly.

Navigating customs can be a daunting task, as I learned firsthand. The process often involves learning the intricacies of customs procedures and enduring unexpected delays and expenses. In my case, I encountered a three-week delay and unexpected fees for customs services and package handling.

For those residing in Spain, a helpful resource on customs regulations can be found in this article, providing valuable insights into navigating the complexities of importing goods.


Lastly, I hope these tips come in handy for your future Homelab adventures. Remember, it's all about having fun and getting things done, even if it's not perfect. So dive in, get creative, and enjoy the ride! Here's to an awesome Homelab project ahead. Cheers!

Homelab For Begineers

Another week brings with it a new update on Datahub.local. In our previous post Journey to Datahub.local, we saw a general overview of how I plan to execute this project with details about goals, steps and some rules. This time, we're delving into the realm of Homelabs or Home Labs.

Note

In this article, I will exclusively concentrate on the hardware perspective. Subsequent topics to be covered in the future will include areas such as operating systems, bootstrapping, application orchestration, security, and more.

What is a Homelab?

Homelab

If Homelab is as foreign word to you as a penguin in the desert, let me break it down for you. A Homelab is like having your own little tech playground at home – a server or a bunch of them where you can host any kind of applications and services.

Furthermore, a Homelab is a dedicated space where IT enthusiasts and professionals can experiment with various hardware and software configurations in a controlled environment. It's essentially a mini data center at home, providing a hands-on experience for learning, testing, and skill development.

Why do you need a homelab?

You don't but setting up a Homelab is a powerful tool for personal and professional growth in the IT field. It allows you to:

  • Gain Practical Experience: Homelabs provide a platform to apply theoretical knowledge in a real-world setting, helping you build confidence in your skills.
  • Test New Technologies: Stay ahead of the curve by experimenting with the latest technologies and software without the fear of disrupting a production environment.
  • Enhance Troubleshooting Skills: Encounter and resolve issues in a controlled environment, honing your ability to troubleshoot and debug problems effectively.

Components

A well-rounded Homelab typically includes the following components:

graph TB
  subgraph SR ["Server Rack / Cabinet"]
    subgraph C [Computing Hardware]
      S1[Server 1]
      S2[Server 2]
      DP[Desktop PC]
    end

    subgraph N [Networking Equipment]
      R[Router]
      R[Switch]
      A[Access Point]
    end

    subgraph S [Storage Solutions]
      LS[Local Storage]
      NAS[NAS]
      CS[Cloud Storage]
    end

    subgraph P [Power Management]
      UPS[UPS]
      PS[Power Supply]
    end

    CM[Cable Management]
  end

  P --> C --> N & S
  UPS --> PS
  S1 <--> S2 <--> DP

Understanding how these components interact is essential for creating a functional and efficient Homelab.

Computing Hardware

Compute infrastructure forms the backbone of a Homelab and typically includes servers and client machines. These can range from repurposed desktop computers to dedicated server hardware. These machines run various virtual machines or containers, enabling users to create and manage different computing environments.

  • Servers: Dedicated server hardware, such as enterprise-grade servers, repurposed desktop computers, or rack-mounted servers. These servers run virtual machines or containers to create different computing environments.
  • Workstations: High-performance desktops and laptops for various tasks, including development, testing, and running specific applications.
  • Microcontrollers: Small devices like Raspberry Pi or Arduino for projects requiring low-power consumption or specialized functionalities.

Networking Equipment

Networking components are needed for connecting the computing devices.

  • Routers: Home routers for basic networking needs or enterprise-grade routers for more advanced configurations.
  • Switches: Unmanaged switches for simple setups or managed switches for network customization and optimization.
  • Access Points: Single-band or dual-band access points for wireless networking within the Homelab.

Storage Solutions

Data is the essential aspect of any Homelab. Having a well-organized storage setup is key for running applications and storing the data. Therefore, choose storage solutions based on capacity and performance requirements.

  • Local Storage: Hard disk drives (HDD) or solid-state drives (SSD) for storing data on individual servers or workstations.
  • Network-Attached Storage (NAS): Dedicated NAS devices or DIY NAS setups using software like FreeNAS to centralize storage.
  • Cloud Storage: Utilizing cloud storage services such as AWS S3 or Google Cloud Storage for offsite backups or data sharing.

Power Management

Ensuring a stable power to our devices is crucial for the reliability. Besides, we need also ways to protect against power outages and provide time to shut down equipment properly.

  • Power Supplies: Standard ATX power supplies for individual components or redundant power supplies for servers.
  • Uninterruptible Power Supplies (UPS): Line-interactive or online UPS to protect against power outages and provide time for proper shutdown.

Organization Tools

Using tools for organizing the rest of components is essential to have an efficient and tidy Homelab setup. hey help maximize space, improve airflow, and provide a structured environment for your components. Proper organization enhances accessibility and aesthetics.

  • Server Racks: An open structure with vertical mounting rails, lacking side panels and doors.
  • Cabinets: An enclosed structure with side panels, front/rear doors, and often locking mechanisms. Provides additional security, protection from dust, and controlled airflow. Suitable for a neater appearance and reduced noise.
  • Cable Management: Cable organizers and ties for maintaining a clean and organized cabling infrastructure.

Cool Ideas for Your Homelab

Apps

Now that you have your Homelab set up, the possibilities are endless for exciting projects and experiments. Here are some cool ideas to spark your creativity:

  • Home Automation Hub: Transform your Homelab into a central hub for home automation. Use platforms like Home Assistant or OpenHAB to control smart devices, set up routines, and experiment with IoT (Internet of Things) integrations.
  • Media Server: Create a media server to centralize your music, movies, and TV shows. Platforms like Plex or Jellyfin allow you to organize and stream your media collection to various devices within your home network.
  • Private Cloud Services: Explore self-hosted cloud services using tools like Nextcloud or ownCloud. Set up your private cloud for file storage, calendar, contacts, and more, providing an alternative to commercial cloud solutions.
  • Game Server Hosting: Host your own game servers for popular titles or create a Minecraft server for you and your friends. It's a fun way to enjoy gaming while managing server configurations and networking.
  • Dockerized Applications: Experiment with containerization using Docker. Deploy applications like WordPress, GitLab, or Grafana in containers, making it easy to manage, update, and scale your services.
  • DevOps Playground: Turn your Homelab into a DevOps playground. Practice continuous integration and deployment (CI/CD) pipelines, container orchestration with Kubernetes, and explore infrastructure as code (IaC) with tools like Ansible or Terraform.
  • Network Monitoring: Set up network monitoring tools such as Nagios, Prometheus, or Grafana to gain insights into your Homelab's performance. Monitor bandwidth, device health, and other metrics to enhance your networking skills.
  • Machine Learning Playground: Explore machine learning and artificial intelligence in your Homelab. Set up Jupyter Notebooks, TensorFlow, or other ML frameworks to experiment with data analysis, model training, and predictive analytics.

Tips to Create a Low-cost Homelab

Finally, I'll be sharing some tips for assembling your own Homelab without breaking the bank. Keep in mind that building a functional Homelab doesn't have to strain your finances. Here are some frugal tips to consider:

  • Reuse Old Hardware: Give a new purpose to old computers and laptops by transforming them into servers or testing machines.
  • Buy Microcontrollers: buy budget devices like Raspberry Pi, which not only come at a lower cost but can also serve for running small applications.
  • Open-source Software: Leverage free and open-source software for virtualization, networking, and storage solutions.
  • Energy-efficient Components: Opt for energy-efficient hardware to save on electricity costs.
  • Start small: Familiarize yourself with the process through a small-scale project. As you gain more experience, you can advance to larger and more sophisticated setups.

Conclusion

In summary, a Homelab proves to be a flexible resource for IT enthusiasts of all expertise levels. Whether you're a novice eager to delve into fundamentals or a seasoned professional aiming to stay abreast of cutting-edge technologies, a Homelab offers a dynamic and adaptable learning space. Begin modestly, and witness your Homelab expand in tandem with your IT proficiency.

Keep in mind that the crucial aspect is aligning your Homelab projects with your specific interests and objectives. Just make it fun and enjoyable so your learning journey will be a great success.

Journey to Datahub.local

Hey there! If my previous post, Embracing the Challenge, you know I’m on a mission in 2024. The quest? Crafting my own Data Platform from scratch called Datahub.local. It’s not just about data – it’s about diving headfirst into the unknown, learning, experimenting, and enjoying the ride. In this article, we're going to map out the game plan for this adventure.

 Journey to Datahub.local

Goals

Embarking on this project requires clear objectives. Let's delve into the goals that will shape my journey.

  1. Hands-On Experience: Dive into practical applications to solidify learning.
  2. Self-Directed Learning: Take charge of my educational path and explore diverse aspects of data management.
  3. Experimentation & Innovation: Encourage creative problem-solving and novel approaches.
  4. Portfolio Development: Build a showcase of skills and projects for professional growth.
  5. Real Experience: Implement the acquired knowledge in real-world scenarios.

What’s the game plan?

With the goals established, it's time to devise a concrete plan that will guide my efforts and actions.

  1. Create my own Homelab: Opt for a cost-effective approach by building a Homelab using small ARM devices, steering clear of excessive cloud expenses.
  2. Deploy Base Components: Establish the foundation for the Data Platform with a Kubernetes cluster. Bootstrap it with DevOps components like ArgoCD, Prometheus, Grafana, etc., ensuring security and performance.
  3. Build the Data Platform: Design and deploy a tailored Modern Data infrastructure, aligning with personal requirements and preferences.
  4. Develop an E2E use case: Develop a meaningful data project to gain practical experience and evaluate the strengths and weaknesses of the new tools. Move beyond the traditional "hello world" approach.

Principles

Finally, every project needs a compass. So, here are some principles to keep things on track and fun.

  • Learn and Enjoy: Prioritize the enjoyment of the learning process.
  • Set Budget and Time Constraints: Be proactive by defining a budget and timeframe, allowing for efficient progress.
  • Flexibility: Postpone tasks that don't contribute to enjoyment or learning.
  • Innovation: Embrace new components, software, or techniques, even if they aren't the best – the goal is to innovate.

And there you have it, folks! This sets the stage for my project. Next up, I'll spill the tea on the hardware I've snagged as I gear up for the exciting phase of implementation. Stay tuned for the next update!

Embracing the Challenge

Embracing the Challenge

With over 15 years as a software engineer, my journey has been a rollercoaster of jobs across various companies and teams — some great, some not so much. One revelation that I had is how fast the technology evolves. In just a few short years, your tech portfolio can become outdated, a relic of a bygone era. Although I've never considered myself a genius, what I do possess is an unwavering determination and consistency. Identifying my weaknesses has been key, whether in personal growth or, in this context, keeping up to date.

As explained before, change is the only constant in the IT work and you must adapt to it, especially from a technological standpoint. Over the past decade, I dedicated significant time to staying current — a pursuit that has proven both gratifying and demanding. The knowledge acquired has empowered me to accomplish tasks that seemed unimaginable just a year earlier. The magic happens when you step out of your comfort zone.

Here's a brief compilation of activities to help you step outside your comfort zone:

  • Seek Feedback: Actively gather feedback from peers to identify areas for improvement.
  • Explore New Opportunities: If growth stagnates, don't hesitate to explore new job opportunities or challenges.
  • Never Stop Learning: Learning is the lifeline of our industry. Constantly evolve by staying informed and acquiring new skills.

And speaking of learning, here are some effective ways to do it:

  • Stay Updated: Engage with relevant sources such as Reddit groups, tech personalities, or media (YouTube channels, podcasts).
  • E-Learning and Reading: Enroll in courses on e-learning platforms or dive into insightful books. These are particularly beneficial for beginners.
  • Certifications Matter: Pursue certifications that are in high demand. It's a challenging journey but adds valuable personal experience.
  • Dive into New Projects: Participate in open-source initiatives or start your projects for a more hands-on learning experience.

As we enter the year 2024, I feel the need to take on something distinct, personal, and significant — an activity that propels me far beyond my comfort zone. Hence, I would like to start a new project called Datahub.local. Over the upcoming months, my goal is to conceive, create, and sustain a personalized Data Platform that can be operated within the confines of my home. This will afford me the opportunity to engage in exploration, experimentation, and, most importantly, learn from failures. Additional details will be shared in forthcoming articles.

Datahub.local

So, buckle up, because my new journey of reinvention has just begun.